Menu art in restaurants conveys flavor, quality, cuisine, and atmosphere before the diners order. Good visuals are important to dishes and a very important part of a restaurant’s brand. But for professional food photography, there’s some setup, lighting gear, food styling, and editing. Dreamina AI offers a user-friendly platform for menu idea generation and editing with prompts and references. Restaurants can create interesting visual directions before they go out for photography. The objective is to develop appealing, accurate images that complement legible menus and a uniform brand.
Understand the Visual Language of Different Restaurant Menus
All restaurants should have a visual style that complements the food, location, and ambiance. Plating, highlighting, and backgrounds are all elegant and restrained on fine-dining menus. Warm lighting, colorful ingredients, and relaxed compositions can be employed in casual restaurants. Soft light, flaky pastries, coffee details, and natural surfaces are common features in cafés and bakeries. Menus of fast casual restaurants benefit from bold colors and familiar food shapes. Veggie-friendly eateries can shine their spotlight on fresh produce, layered greens, and colorful vegetables. Specialty cuisine calls for the right ingredients, serving customs, and cultural nuances. Descriptive prompts help explore these different directions, rather than forcing every menu to fit one aesthetic, with Dreamina AI.
Choose the Right AI-Generated Visuals for Every Menu Category
Sections of the menu may have different priorities when it comes to attention. Signature dishes, chef’s specials, and seasonal items can be featured in hero images. Photographs with supporting materials can be used to present appetizers, main courses, desserts, and drinks. Menu sections are separated by decorative graphics, and ingredient illustrations highlight unique ingredients. Digital menus and promotional campaigns can be enhanced with background imagery, which doesn’t detract from dish descriptions. Accurate glassware, garnishes, ice, foam, and condensation are all helpful to beverage visuals. While an AI Image generator can be useful for considering these formats, not all meals require a photo. Selective imagery retains readability, minimises visual information overload, and highlights the significance of the dishes.
Write Better Food Prompts With Composition, Lighting, and Texture
Clear cues give more directed creative directions rather than fluffy requests for tasty tidbits. First, tell about the real dish, the ingredients, how to prepare it, how it is served, etc. Then detail the composition – overhead flat lay, three-quarter angle, close-up, or centered hero. The light may be described as soft window light, diffused studio light, or dramatic side light. Use words like “crisp crusts,” “glossy sauces,” “flaky pastry,” and “fresh herbs” to describe texture. Select backgrounds that blend with the cuisine, such as stone, wood, ceramic, or linen. For instance, you can ask for a freshly baked pizza margherita on a ceramic plate, with visible basil, melted mozzarella, clean side lighting, and composition. These details can be translated into visual concepts by Dreamina AI. Never take the ingredients for granted; verify the correct proportions and consistency with the real dish.
How to Design Menu Visuals Restaurants Love with Dreamina?
Step 1: Set your menu concept and write a prompt
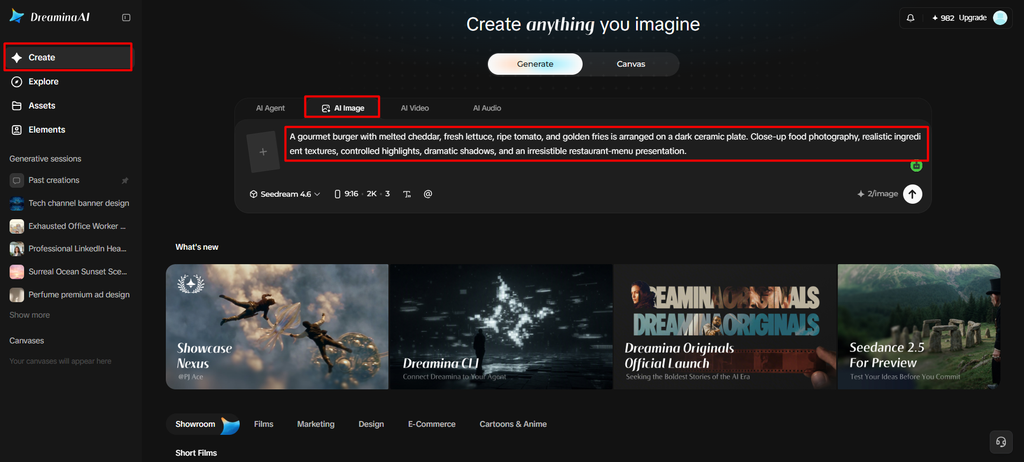
- First, sign up or log in to Dreamina to start designing your restaurant menu visuals.
- Next, open the “Create” tab in the left menu and choose the “AI Image” option.
- Later, type a detailed prompt describing the dishes, plating, and overall style your menu needs. Add details about image elements, such as fresh ingredients, along with the theme and concept.
Step 2: Pick a food style and generate your dishes
- Next, pick an image model from the options at the bottom of the dialogue box.
- You can select Seedream, GPT Image, or Nano Banana, depending on your preferred food style.
- You can upload a reference image to make your dish photos look precise and natural.
- Then, set a custom aspect ratio and resolution via the “Aspect ratio” and “Resolution” tabs.
- You can choose how many menu images to create using the “Images to generate” tab. Set the custom dimensions of each image using the “Dimensions” tab to match your layout.
- If you want text on the menu image, use the “Draw text on image” tab.
- Finally, click on the “Generate” tab to start creating your restaurant menu visuals right away.
Step 3: Refine your menu visuals and save them
- You will receive the chosen number of menu image drafts in just a few moments. If a result looks off, use “Edit prompt” or “Regenerate” to refine the generated results.
- You can also upscale the draft with the “Creative upscale” option for sharper print quality.
- Moreover, use “Retouch” to correct, clean up, or enhance garnish details on the selected image.
- Use “Remove” to erase anything unwanted from your image, such as stray crumbs or smudges. You can also expand your image with the “Expand” tab to fit the menu layout.
- To turn your generated image into a moving visual, you can choose the “Generate video” tab.
- Dreamina gives you complete freedom to edit every menu image exactly the way you like.
- Finally, click the “Download” tab present at the top right corner of the main interface. This saves the menu image file on your local device, ready for print or web.
Build a Consistent Menu Aesthetic With AI-Generated Variations
A consistent visual identity will make menus more recognizable and easy to understand. Before creating several dishes, set up a small brand palette, complementing backgrounds and lighting. Using reference images can help guide continuity for related visuals, but there will still be a review process. Dreamina AI offers multimodal image creation and an AI creative agent that can delve into a variety of visual directions based on a single command. These capabilities help to build up the seasonal concepts while preserving recognizable brand characteristics. Do not use too many decorative graphics – signature-dish imagery should be kept prominent. Include enough white space for headings, prices, and descriptions, particularly when resizing images for different layouts.
Prepare AI Menu Images for Print, Digital Screens, and Online Ordering
Different sizes and resolutions must be used for different publishing formats, and appropriate cropping must be done to fit the size. Images must be appropriate for printed menus and be the correct size for the menus and in line with the printer’s guidelines. Clear focal points and aspect ratios are advantageous for digital menus. Dishes should be identifiable at smaller, online ordering thumbnails. Space for information about offers should not be used to cover up food. Also, the menus of the website should be compressed appropriately in order to balance the website loading speed and the clarity of the images. Depending on the model, Dreamina AI can handle various aspect ratios and resolutions. Keep meaningful pictures and readable dish names and descriptions together to keep things accessible.
Avoid Common AI Food-Image Mistakes Before Publishing
Attractive images created still need fact and visual checks. Look for distortions in cutlery, plate shape, food texture, position of food items, and ratios. Make sure all the ingredients and garnishes featured in the picture are accurate to the restaurant’s menu. Don’t use pictures that misrepresent portion sizes or suggest that an ingredient is unavailable. Maintain human control of prices, allergen statements, and ingredient lists. Check commercial usage rights, permissions for reference images, and platform terms before publishing. Lastly, don’t vary the balance between photo and illustration unless it is intentional for the design.
Conclusion
AI-generated imagery offers restaurants a chance to experiment with new concepts, add spice to their seasonal menus, and create visual consistency. Through this process, Dreamina AI provides prompt-based generation, reference-guided creation, and targeted editing. But convincing images should depict real food, be legible, and be consistent with the restaurant’s brand. Initial concepts are carefully reviewed to become a practical menu asset that effectively communicates across print, digital displays, and online ordering.